Technical Center
Catalog downloads, installation guides, a glossary of standards and knowledge articles.
Downloads
Catalog and technical sheet downloads
You can download the catalogs as PDF files. Product-specific technical sheets will be added here as they are prepared.
-
Download PDF
Terastone catalog
Engineered stone slabs, applications and pattern codes.
PDF · 8.9 MB
-
Download PDF
Ölmez Beton catalog
Terrazzo tiles, concrete paving, kerbs and precast products; size and pallet tables.
PDF · 2.9 MB
Installation
Installation guides
Terrazzo tile floor installation Show the steps
Laying mortar thickness: minimum 15 mm, maximum 30 mm
- The surface to be covered must be cleaned of all dust and dirt.
- Laying mortar: prepare a mix of 4 parts sharp sand up to 6–7 mm with 1 part cement. Mark out an area you can lay within 15 minutes at most.
- Spread the mortar with a trowel so that no voids remain, and sprinkle a little water on the surface.
- Place the tile and level it to the string line using a rubber mallet. Use a plastic mallet for installation.
- Keep laying with a joint gap of at least 2 mm and at most 6 mm; use plastic joint spacers that match the joint width.
- Make sure no mortar is left on the surface. Laying mortar thickness must be at least 15 mm and at most 30 mm; where it exceeds 3 cm, lay a cushion of lower-dosage mortar before the laying mortar.
- Grouting should be done at least 3 days later. Prepare the grout by adding 5 kg of fine marble powder and, if needed, pigment to 1 bag of cement, according to the colour of the tile. Mix this dry blend with water thoroughly to a thick buttermilk consistency and spread it on the clean surface.
- To fill the joints well, work the wet grout across the surface in different directions with a rubber squeegee. Once sure the joints are full, sprinkle the dry grout mix and clean the remaining grout off the surface thoroughly with dry cloth such as sacking; if the surface is not cleaned well, the gloss of the tiles will be dulled.
- A day after grouting, wet the surface to prevent the grout from cracking.
- Soft soap is enough for cleaning. Never use chlorine-based or acidic cleaning products.
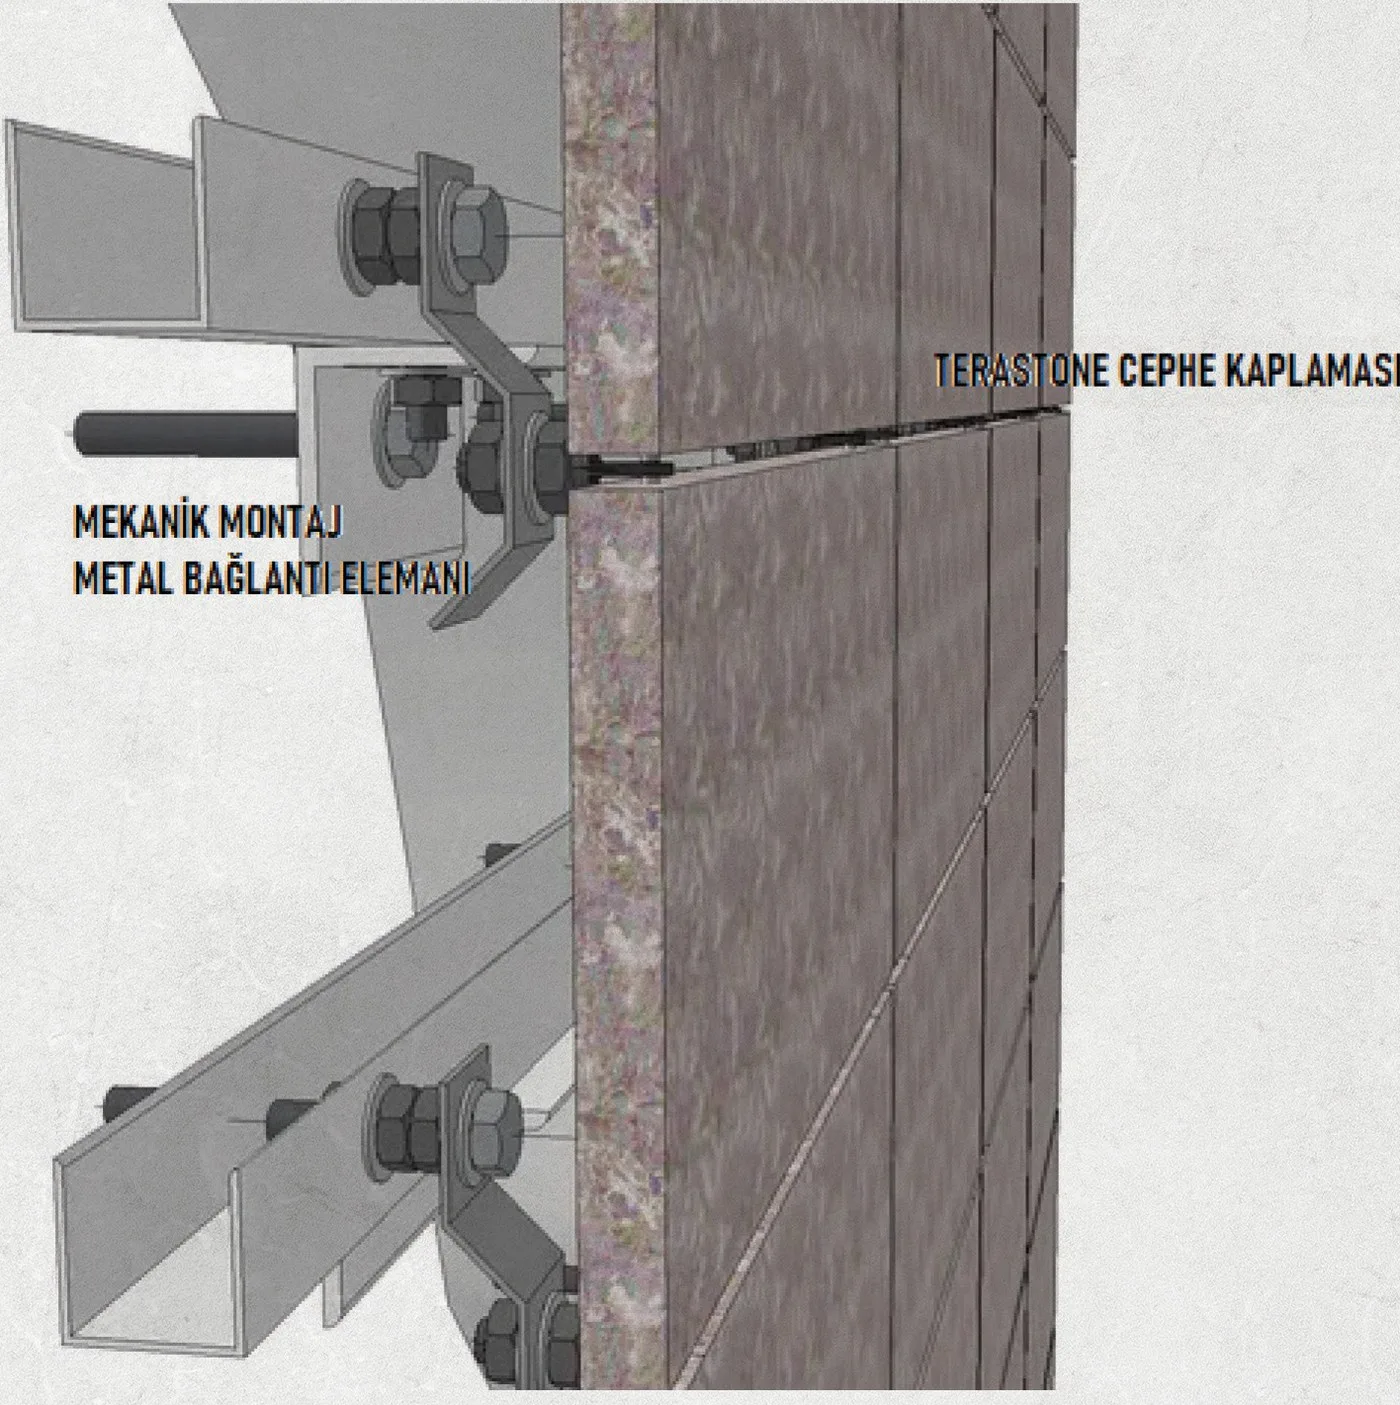
Terastone facade mechanical installation Show the steps
Facade installation of materials such as granite and marble can be carried out with the method known as mechanical installation.
Mechanical installation is the method of fixing cladding to the building surface with stainless steel elements called hooks or anchors. With this system the weight of each stone is transferred to the building separately. If wished, after installation any stone can be removed without harming the others, left out, or replaced with another element.
Bonding is unsuitable especially on tall buildings. Expansion and contraction caused by temperature differences in the materials, together with settlement and vibration in the building, make the risk of a bonded stone falling very high.
In a mechanical installation system, different anchoring methods should be chosen depending on the surface, the stone sizes and the height of the building. The installation system is designed and carried out specifically for each building. The supporting system should preferably be entirely stainless.
Glossary
Glossary of standards
The standard codes that appear on our products and what they cover.
- TS EN 15285
- Agglomerated stone: modular tiles for internal and external flooring and stairs
- TS EN 15286
- Agglomerated stone: slabs for internal and external wall finishes (facades)
- TS EN 13748-1
- Terrazzo tiles, interior: glossy, matt and patinato (TS 213-1 / EN 13748-1)
- TS EN 13748-2
- Terrazzo tiles, exterior: pavement, washbeton and tactile surfaces (TS 213-2 / EN 13748-2)
- TS 2824 EN 1338
- Concrete paving blocks
- TS 436 EN 1340
- Concrete kerb units
- TS EN 14844
- Precast concrete box culverts
- TS 821 EN 1916
- Concrete and reinforced concrete pipes
- EN 1917
- Concrete and reinforced concrete manholes and inspection chambers
Knowledge articles
Knowledge articles
-
What is terrazzo?
Definition, production, properties and uses of terrazzo (artificial marble) tiles.
Read the article
-
What is an engineered stone slab?
The structure, production and properties of agglomerated stone slabs such as Terastone.
Read the article
-
What is mechanical facade installation?
The mechanical installation method for facade cladding using hooks and anchors.
Read the article
Get a quote for your project
Share your product, size and quantity details and our team will get back to you shortly.